
I spent the entire last week building one cabinet, the blind corner cabinet in my pantry — but it was worth it! You know I like to use every inch of space so when it came to designing the cabinets for my pantry corner, I had to come up with a really smart plan to give me access to the complete corner. What I came up with is a sort of puzzle of cabinets inside the main cabinet that gives me access to the entire blind corner with NO wasted space! Woohoo!
Build a DIY Corner Cabinet with no wasted space.

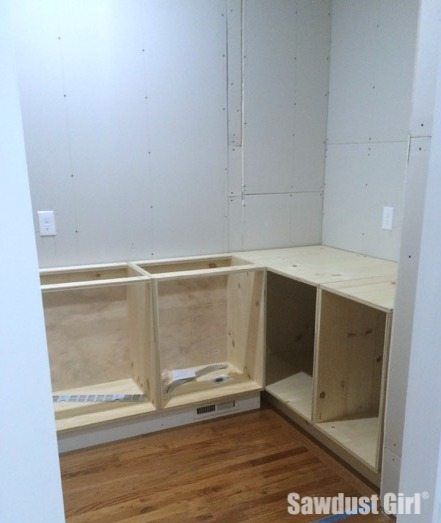
I built non traditionally sized cabinets for my pantry. The cabinets on the left are only 20″ deep while the right cabinets are a whopping 28″ deep. I’ll also show you the mechanics and inner workings of the rolling, sliding and hinging cabinet puzzle and you can make this system work for your blind corner situation.
I started out by building the cabinet bases that will sit on the left of the corner. Then I took the width of the right side bank of cabinets and came up with a configuration that would allow me to build one cabinet, large enough to have approximately equal portions on both sides of the cabinet that buts up against it (covering half of the opening).
Then I built a cabinet carcase, slightly smaller than half the remaining opening in the main cabinet. This cabinet will roll back and forth from the opening and into the “blind space”. This cabinet is 2″ more shallow and 4″ shorter than the main cabinet to allow for rolling devices.

I initially used one set of drawer slides and built a single pull-out with two shelves but that didn’t work out after the whole configuration was put together so I took that apart and build 2 individually opening drawers instead.

Next I mounted 2″ casters onto the bottom of the “slide-over” cabinet. It’s imperative that these wheels are installed exactly straight! You can see from the number of extra holes that I tried a few times. What ended up working for me was screwing a cleat parallel with the side of the cabinet, placed the wheel next to that cleat and then screwed another cleat next to that. The caster sandwiched in between the two cleats was the only way I could secure the casters and keep them exactly straight.
*Do not use swivel casters! I tried. Swivel casters work in such a way that when you pull in one direction, stop and the pull in the opposite direction they swivel around so the lead is in front. That swivel action will not work in the track and they are stubborn about wanting to swivel. They’ll fight you all the way. Just use non swiveling casters and make sure they are on straight. 

I created a track for the front casters to ride in so the rolling cabinet wouldn’t “drift”. I used a strip of wood the same width as the cleat I used to sandwich the caster while I secured to. This is to ensure that the “roller cabinet” rides at the front of the main cabinet but doesn’t stick out too far.

I don’t want this cabinet to tip when the drawers are pulled out so I used another caster secured to a cleat which I secured to the back of the “rolling cabinet”. Getting this new “Roller” into the main cabinet now is tricky!
I secured the caster to the top of the cleat, then screwed the cleat onto the cabinet on ONE end only. This allowed me to tilt the caster mounted cleat down and out of the way giving me the clearance I needed to get the cabinet up over the guide and into place. Once my rolling cabinet was in place, I tilted the caster mounted cleat up until the caster came into contact with the main cabinet top. Then I drove a screw at an angle through the side of the rolling cabinet and into the cleat, securing it on the second side.
You don’t want that top caster putting pressure onto the cabinet roof, or it will make the rolling less smooth. Just touching will create enough resistance so it won’t tip over (as long as your main cabinet is secured to the stud as it should be).

Now the “rolling cabinet” glides easily from side to side!

Next it was time to build a pull-out that would utilize the remaining space in the main cabinet.

I built a double shelf pull-out out of 1/2″ plywood so it would be as light as possible. The depth of this cabinet needs to be 5-7″ shallower than the main cabinet to allow for the glide and hanging “hardware”.

I cut two cleats the height of the pull-out and 7″ wide and secured them to the most heavy duty piano hinge I could find. I have NO IDEA what the weight capacity was on any of the piano hinges I saw because that was apparently not information the manufacturer deemed important. I bought the thickest one which was too long but piano hinges are continuous hinges so you can cut them as needed and they’ll still work (generally).
Secured the hinge to the two cleats – as shown.

I used a metal cutting blade on my mini reciprocal saw to cut the hinge flush with the cleats.

And made sure to file the ends smooth after cutting the metal.

Next, I secured one of my hinged cleats onto the cabinet.

I’m using pocket door hardware in my cabinet! I hemmed and hawed about how to get this contraption to work. I looked at flipper door hardware, pull-up appliance shelf hardware, cutting down part of a traditional drawer slide…This is the best I could come up with!
One track kit comes with two wheels so I got one 48″ track kit for $27.00 and two extra wheels for $10. I cut the track in half.

I mounted the wheels on both ends of my free swinging cleat.

I blocked out the side of the cabinet behind and inside the “Rolling Cabinet” guide and mounted one track on top of that block.

I also had to block out the top of my cabinet so I could install the top track at the right height for the cabinet and both sets of rollers. There was a lot of fiddle factor here: making sure the wheels fit securely but not too snug. There is some adjustability with the track door hardware so it wasn’t imperative that this cleat be accurate down to the fraction of the inch. Thank goodness!

The rollers go into the track — holding the cabinet and getting all 4 rollers in the track is FUN! Extra hands are a plus. The hardware kit comes with a stopper to keep the rollers from rolling right out of the track. I used one on the top only and that was enough.
Now this Pull-Out cabinet can slide back into the main cabinet or pull forward and hinge over out of the way of the hidden Roll-Over cabinet.
Since all the weight of this cabinet is on the hinge, it can be a little wibbly wobbly and I have no idea how much that hinge can take so I definitely won’t put anything heavy in this cabinet. We’ll see how long it holds up. Maybe I’ll come up with a better solution.

I did a couple dry fits and changing things up before I came up with what I’ve got. This configuration is the best I could come up with. Before placing the Roll-Over cabinet in place for the final time, I covered the sides with scrap wood to keep anything from falling out of the drawers and into the path of the “roller”.

I also needed to screw a little block in the far side of the cabinet to prevent the “Roller” from getting too far into the main cabinet making it difficult to grab and pull over.

Once I’d made sure everything was working beautifully and sized correctly, I put on my faceframe and secured the adjoining cabinet in place.

And now almost every single inch of space in my blind corner is usable cabinet space.Boom!
Well worth a week of brain teasing, muscle making work for this Sawdust Girl!
Watch my video of this configuration in action!
Want to build awesome Cabinets? Get my E-Book!

$9.99 Add to cart
For those that want the whole thing figured out for them, I’ve drawn up plans for a 24″ deep main cabinet with the appropriate inner cabinets … but this tutorial is already a mile long so I’ll post that plan… sometime soon.